A PDF version of this guide, including project setup and debugging is available in the Documentation section
This guide is aimed at IAR Embedded Workbench users who are interested in integrating the IAR tools within Eclipse. For instructions relating to integrating GCC within Eclipse see this guide.
This is the third guide in this series of step-by-step guides on setting up and using the IAR Embedded Workbench within the Eclipse IDE. In part 1 we installed and configured the IAR toolchain, the Eclipse IDE as well as the IAR Eclipse Plugin. Part 2 went over how to create a managed build project in Eclipse using the IAR tools. In this guide we’ll look at how to setup a Makefile project where the user is responsible for providing a suitable Makefile to build the application or library.
This guide will focus on the steps that must be performed within Eclipse to get a Makefile project working. Additional information on how to write a Makefile for the IAR tools can be found in another article on the subject.
Makefile Project
Creating a Makefile project with the IAR Eclipse Plugin is slightly different from creating the usual Makefile project using Eclipse CDT. The first step is to create a managed build project in the exact same way as was done in the previous section. Then we’ll modify the project configuration to use a custom Makefile instead of auto-generating one.
Start by opening the new C/C++ Project dialog from the “File->New->C/C++ Project” menu item.
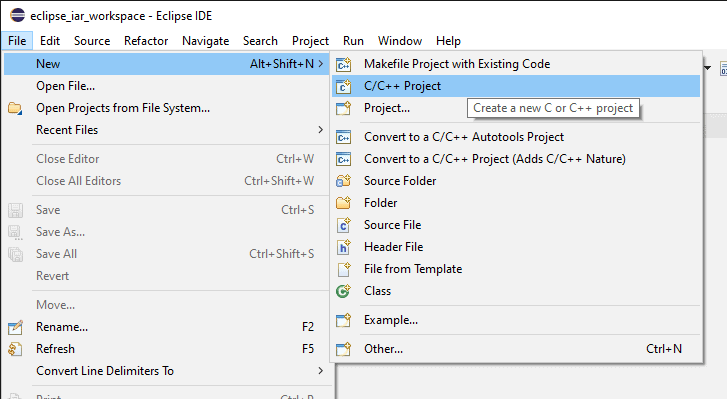
This should open the new project dialog.
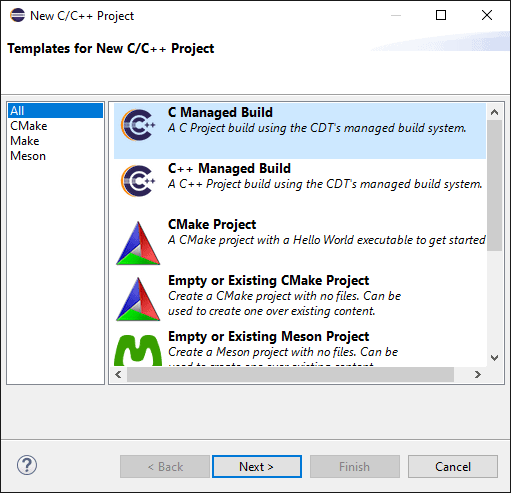
Select “C Managed Build” and click “Next” to go to the project type and name configuration.
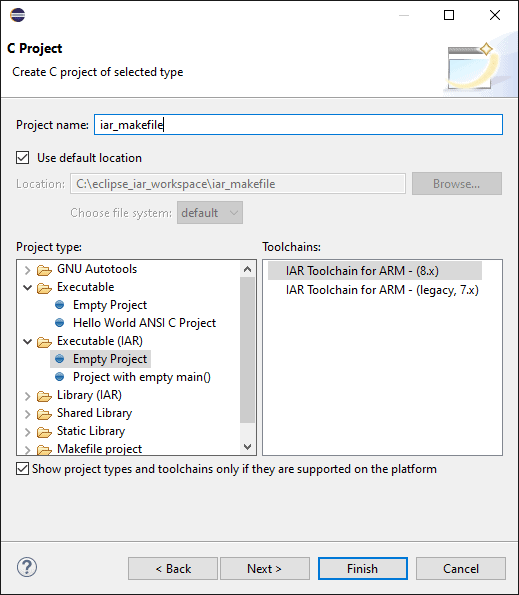
Type a name for the new project, this example uses “iar_makefile” as a project name.
In the project type panel (the left pane) expand the “Executable (IAR)” category and select “Empty Project”. In the right pane make sure to select “IAR Toolchain for ARM – (8.x)”.
Click “Next” to continue the wizard. The project build configurations panel should be displayed.
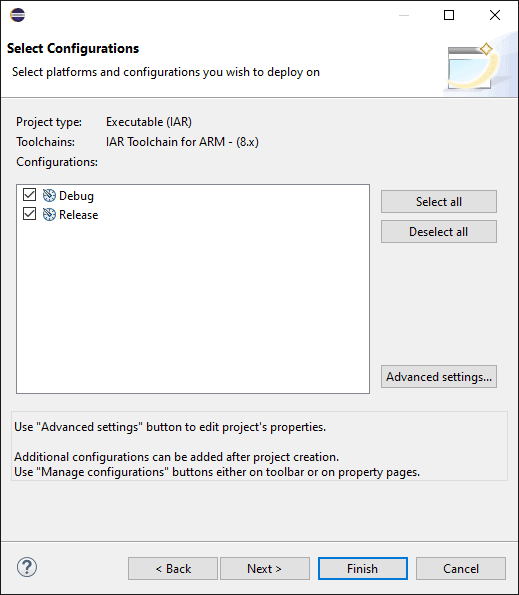
No changes should be performed in this panel so click “Next” again to continue.
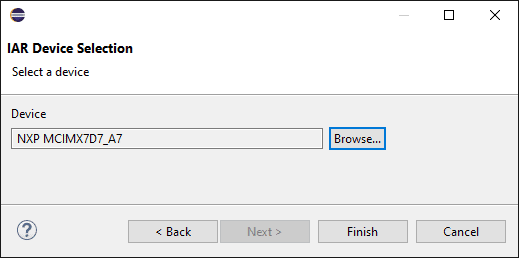
From the device selection dialog click “Browse” to select the MCU or SoC to target with this project. This example will use the NXP i.MX 7 SoC but any other supported MCU can be used.
Click “Finish” to end the wizard and create the new project. The newly created project should appear in the workspace.
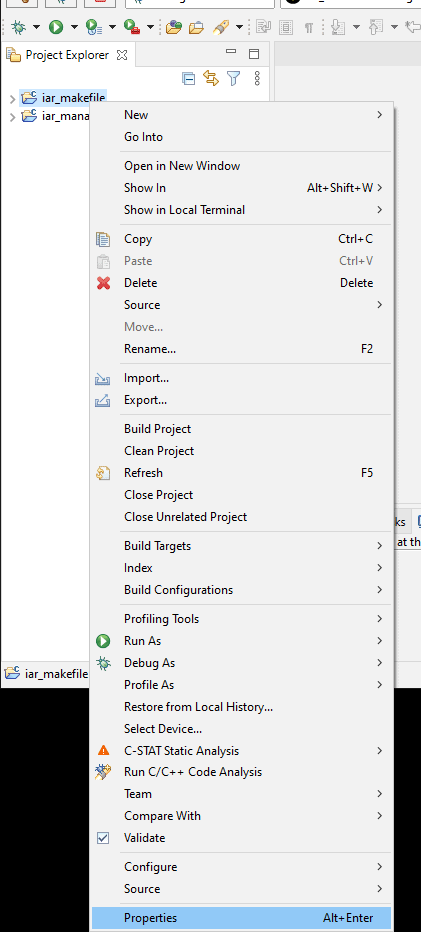
Right click the newly created project and select the “Properties” item from the context menu.
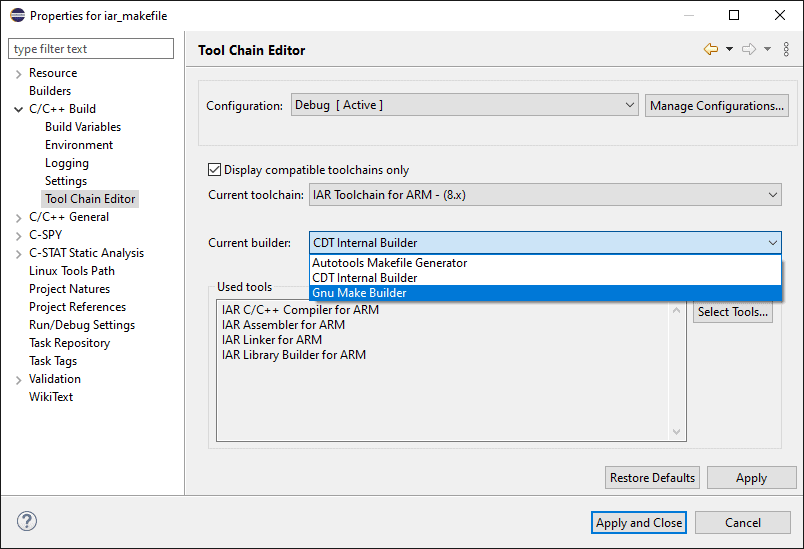
In the project properties screen navigate to the “C/C++ Build->Tool Chain Editor” category. In the displayed panel change the “Current builder:” selection to “Gnu Make Builder”.
Now open the “Settings” category and open the “Error Parsers” pane. It’s possible that the pane isn’t displayed in which case two arrows will be displayed next to the panes tabs that can be used to navigate through the tabs.
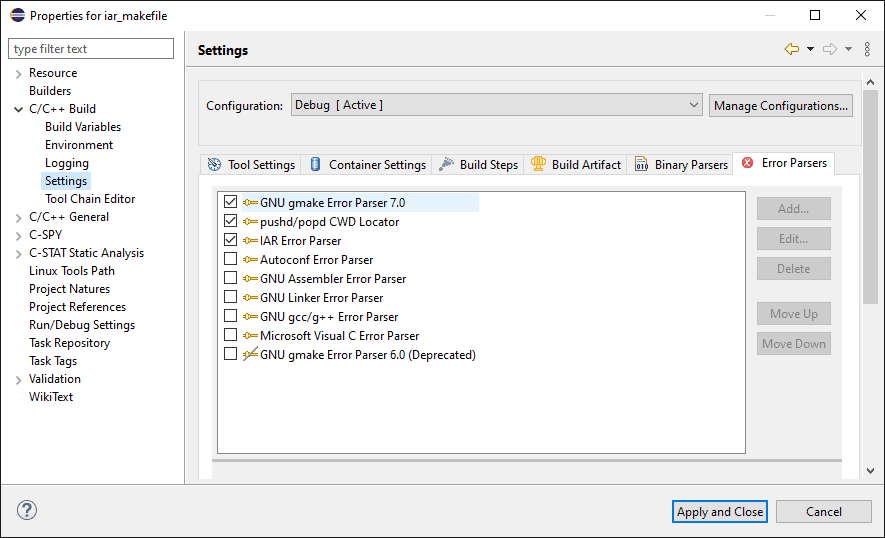
In the Error Parsers panel make sure that “GNU gmake Error Parser 7.0” and “IAR Error Parser” are checked. This will help CDT parse the build errors correctly and enable jumping to the source of an error from the console by double clicking on a displayed build error.
Now open the “C/C++ Build” root category.

From the “Builder Settings” pane uncheck “Generate Makefile automatically”. Also modify the build location to point to the root of the project created earlier in this section. For the example project that was named “iar_makefile” the resulting path should be “${workspace_loc:/iar_makefile}/“.
Click “Apply and Close” to save the settings and return to the workspace.
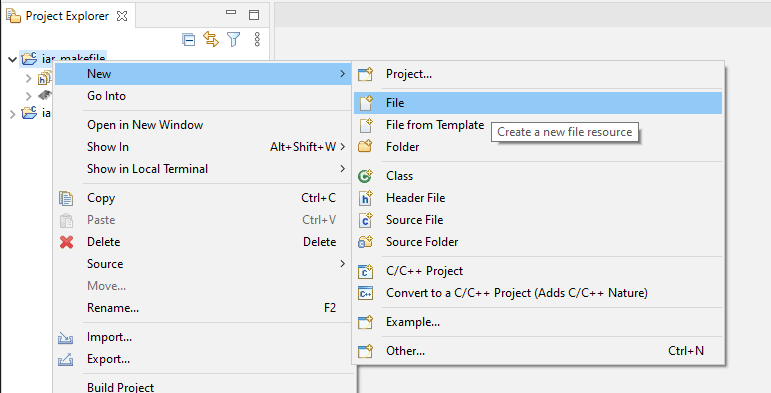
Now let’s create a dummy source file to build. Right click on the project and select the “New->File” context menu item.
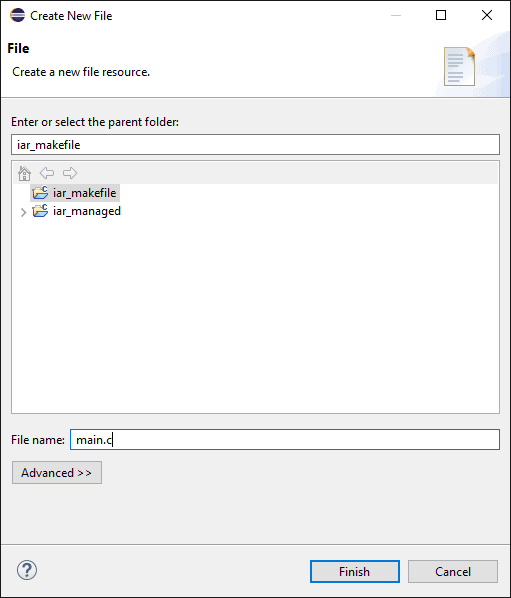
Type the name “main.c” as the source file name and click “Finish”. The new empty file should open in the IDE.
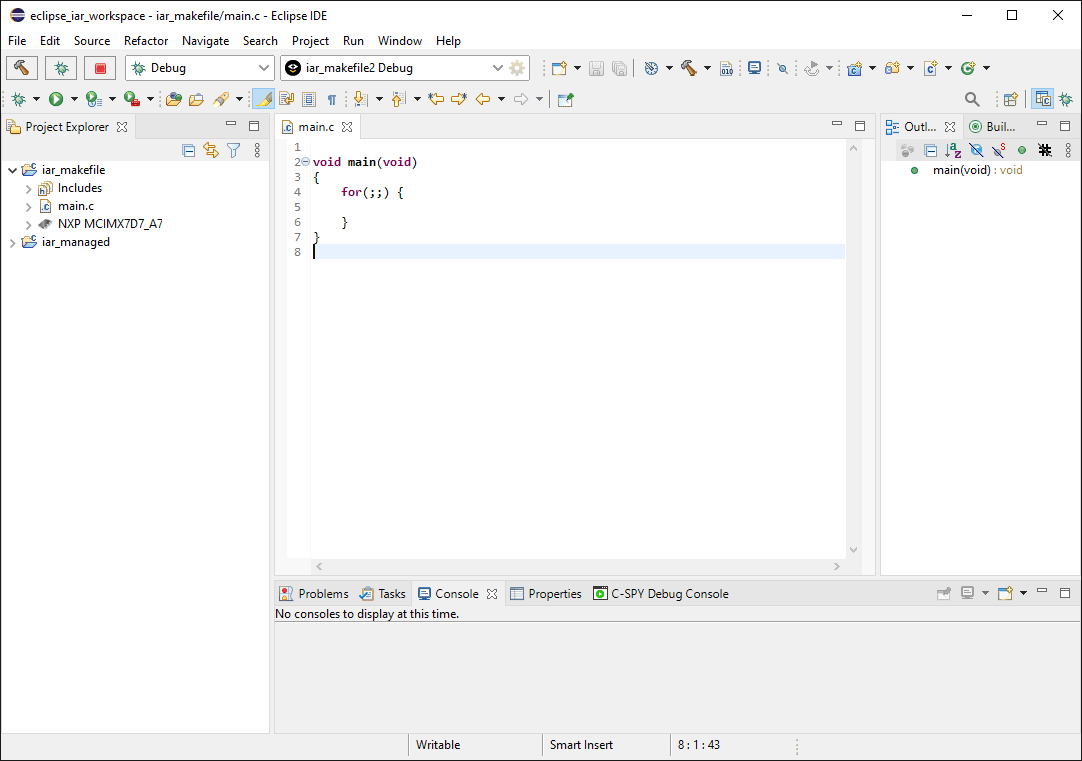
For the purpose of this example let’s populate the source file with a dummy main function with an infinite loop.
void main(void)
{
    for(;;) {

    }
}
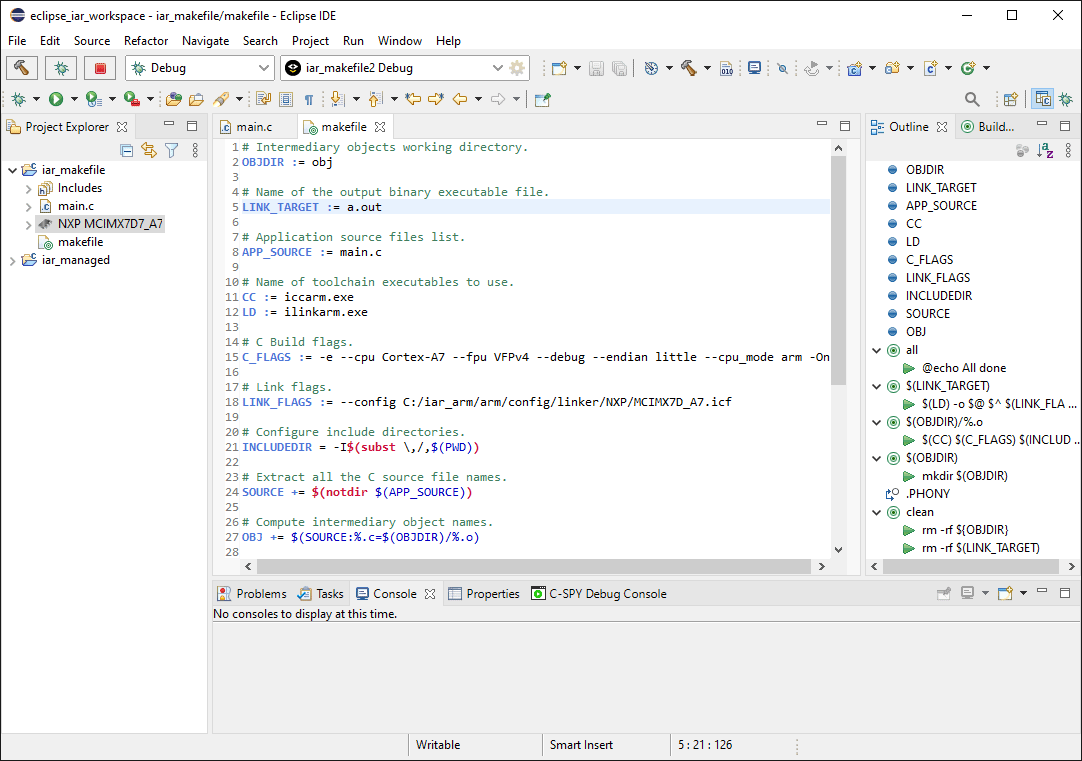
Next add another file to the project named either “Makefile” or “makefile” and copy the content of the example makefile below. For more information on writing a Makefile using the IAR tools see this article.
# Intermediary objects working directory.
OBJDIR := obj

# Name of the output binary executable file.
LINK_TARGET := a.out

# Application source files list.
APP_SOURCE := main.c

# Name of toolchain executables to use.
CC := iccarm.exe
LD := ilinkarm.exe

# C Build flags.
C_FLAGS := -e --cpu Cortex-A7 --fpu VFPv4 \
    --debug --endian little --cpu_mode arm -On

# Link flags.
LINK_FLAGS := --config C:/iar_arm/arm/config/linker/NXP/MCIMX7D_A7.icf

# Configure include directories.
INCLUDEDIR = -I$(subst \,/,$(PWD))

# Extract all the C source file names.
SOURCE += $(notdir $(APP_SOURCE))

# Compute intermediary object names.
OBJ += $(SOURCE:%.c=$(OBJDIR)/%.o)

# Build everything.
all : $(OBJDIR) $(LINK_TARGET)
    @echo All done

# Firmware binary linking.
$(LINK_TARGET) : $(OBJ)
    $(LD) -o $@ $^ $(LINK_FLAGS)

# C files build.
$(OBJDIR)/%.o : %.c | $(OBJDIR)
    $(CC) $(C_FLAGS) $(INCLUDEDIR) -o $@ -c $<;

$(OBJDIR) :
    mkdir $(OBJDIR)

.PHONY: clean
clean:
    rm -rf ${OBJDIR}
    rm -rf $(LINK_TARGET)
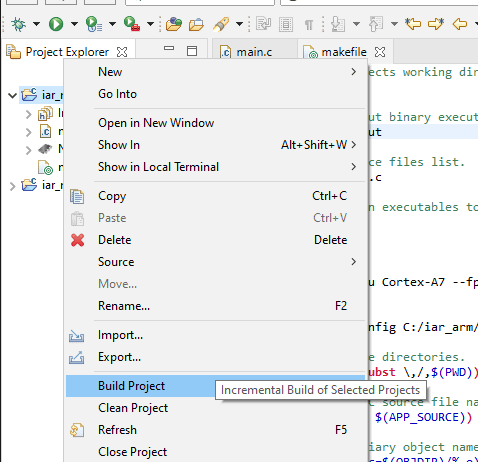
With everything set up right-click again on the project and select “Build Project” from the context menu.
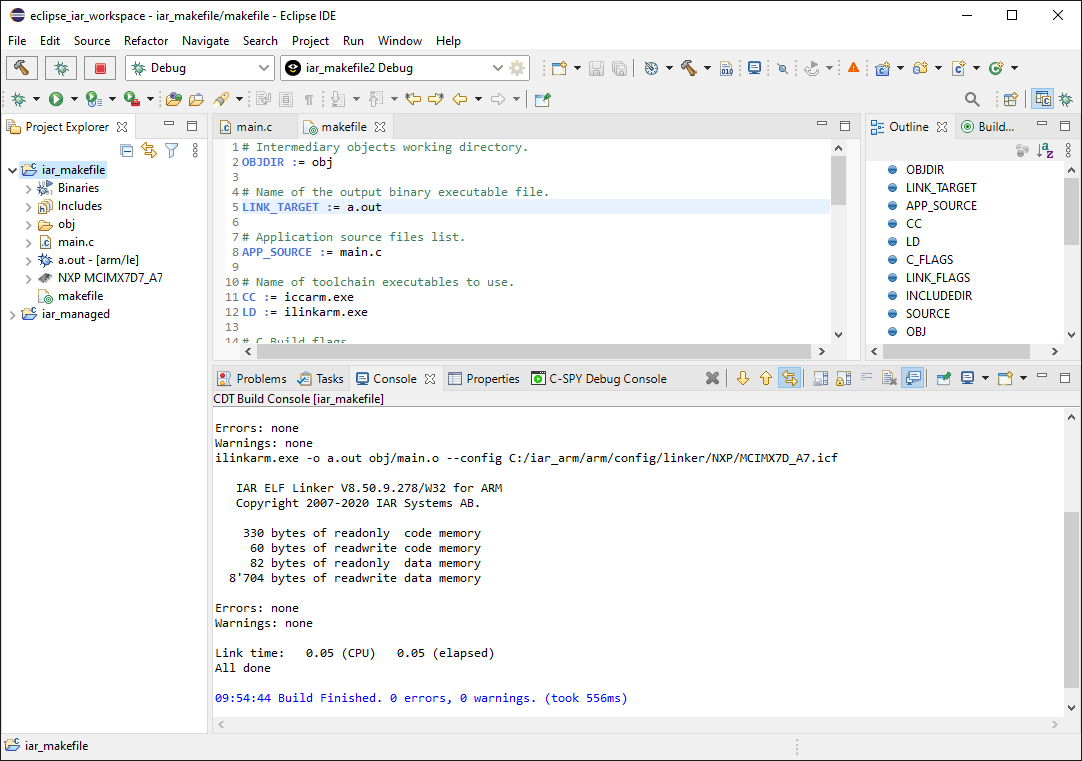
If all went well the project should now be built and ready to be loaded onto a target and debugged.
Check out part 4 for information on creating a debug configuration for both managed and Makefile projects.
Visit the Documentation section for a PDF version of this guide including project and debugging setup.